Controller Custom Instruction Usage Example
This document is only applicable to users with C++ development experience
This article focuses on teaching using the controller secondary development demo from related downloads, and should be read alongside the code in the demo.
1. Registering the Custom Instruction Callback Function
NRC_SetJobFileCustomInstructionCB(userdefinecmd); // Register custom instruction callback functionRegistered function:
bool userdefinecmd(int id, const std::string & paramStr,const std::string & posName)
{
	// id : Corresponds to the first parameter in the teach pendant interface userdefine_cmd_insert
	// paramStr : Corresponds to the second parameter in the teach pendant interface userdefine_cmd_insert
	return true;
}
2. Packaging a Function to Retrieve Custom Instruction Parameters Sent from the Teach Pendant (Optional, you can also develop your own parsing for this part)
Package a function to parse the received string:
// Utility function to split a string and store in a container
std::vector<std::string> split(const std::string& s, char delimiter)
{
	std::vector<std::string> tokens;
	std::string token;
	std::istringstream tokenStream(s);


	while (std::getline(tokenStream, token, delimiter))
	{
		tokens.push_back(token);
	}
	return tokens;
}
Usage example of the split function:
std::vector<std::string> param = split(paramStr,' ');
param.erase(param.begin());
double vel = atoi(param.at(2).c_str());
double acc = atoi(param.at(3).c_str());
double dec = atoi(param.at(4).c_str());
3. Usage Example
Parse the speed, acceleration, and deceleration parameters sent by the teach pendant and use them. Below is an example of a custom instruction running three MOVJ motions:
Note: Motion instructions within custom instructions can only use the motion interfaces introduced in the API introduction.
bool userdefinecmd(int id, const std::string & paramStr,const std::string & posName)
{
	// id : Corresponds to the first parameter in the teach pendant interface userdefine_cmd_insert
	// paramStr : Corresponds to the second parameter in the teach pendant interface userdefine_cmd_insert
	int robotNum = 1;                                               // Define the robot number to control
	if (id == 1)
	{


	}
	else if (id == 2)
	{
		// Split string to get parameters
		std::vector<std::string> param = split(paramStr,' ');
		param.erase(param.begin());
		double vel = atoi(param.at(2).c_str());
		double acc = atoi(param.at(3).c_str());
		double dec = atoi(param.at(4).c_str());                     // Extract the parameters packaged by the teach pendant


		NRC_Position pos1 = {NRC_ACS, 40, 0, 0, 0, 0, 0};
		NRC_Position pos2 = {NRC_ACS, 0, 0, 0, 0, 0, 0};
		NRC_Position pos3 = {NRC_ACS, -40, 0, 0, 0, 0, 0};       // Robot motion target positions


		NRC_Jobrun_MoveDirect(robotNum, pos1, vel, acc, dec, 5);      // MOVJ motion instruction
		NRC_Jobrun_MoveDirect(robotNum, pos2, vel, acc, dec, 5);
		NRC_Jobrun_MoveDirect(robotNum, pos3, vel, acc, dec, 5, true);    // The last motion instruction must advance to the next line, pass true to moveToNextLine!!! Otherwise there may be a robot runaway accident!


	}
	else
	{
		printf("no this cmd");
	}


	return true;
}
4. Running Custom Instructions
At this point, the code portion is complete. After compiling the secondary development programs for both the teach pendant and the controller, upgrade them separately into the teach pendant and controller (for compilation questions, refer to the controller quick start tutorial and teach pendant quick start tutorial in the documentation). After the programs have been upgraded, insert the custom instruction we just wrote into the job file, as shown:
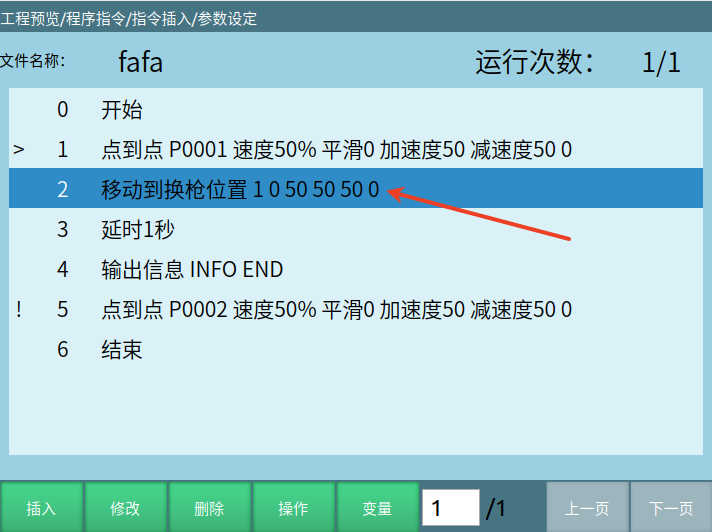
After the job file instructions have been inserted, switch to run mode and start the program. When the program reaches the custom instruction "Move to switch gun position 1 0 50 50 50 0", it will begin executing all the code within the userdefinecmd function in the example above (three MOVJ motions).
5. Advanced Tutorial
When the user needs to perform program control, robot status control, IO control, or their own functional code when the robot moves to a certain point, if this code is directly added to the registered custom instruction function and then the custom instruction is run on the teach pendant, the robot will keep moving but the user's code will have already finished executing at the beginning of the custom instruction. In this case, you need to use the following blocking interface to block the program where needed.
/**
 * @brief Block non-motion instructions. When a robot motion instruction is currently executing and has not completed, it will block at this interface, preventing the program from continuing execution;
 * @brief During breakpoint recovery, the program will continue executing from this interface where it was paused
 */
void NRC_JobRun_BlockNotMoveInstruction();
Example 1: When the robot moves to a certain point and needs to turn on IO output
bool userdefinecmd(int id, const std::string & paramStr,const std::string & posName)
{
	// id : Corresponds to the first parameter in the teach pendant interface userdefine_cmd_insert
	// paramStr : Corresponds to the second parameter in the teach pendant interface userdefine_cmd_insert
	int robotNum = 1;             // Define the robot number to control
	if (id == 1)
	{


	}
	else if (id == 2)
	{
	        NRC_Position pos1 = {NRC_ACS, 40, 0, 0, 0, 0, 0};
		NRC_Position pos2 = {NRC_ACS, 0, 0, 0, 0, 0, 0};
		NRC_Position pos3 = {NRC_ACS, -40, 0, 0, 0, 0, 0};       // Robot motion target positions


		NRC_Jobrun_MoveDirect(robotNum, pos1, 80, 50, 50, 0);
		NRC_Jobrun_MoveDirect(robotNum, pos2, 80, 50, 50, 0);
		NRC_JobRun_BlockNotMoveInstruction();// Blocking interface, blocks the program at this position, and unblocks after the previous MOVJ motion reaches the target point
		NRC_DigOut(1, 1);      // Turn on the corresponding IO digital output
		NRC_Jobrun_MoveDirect(robotNum, pos3, 80, 50, 50, 0, true);    // The last motion instruction must advance to the next line, pass true to moveToNextLine!!! Otherwise there may be a robot runaway accident!
	}
	else
	{
		printf("no this cmd");
	}


	return true;
}
Most non-motion interfaces from the nrcAPI.h header file can be used within the registered function.
Example 2: When the robot moves to a certain point and needs to execute the user's own functional functions:
When the robot moves to the target position of pos2, it starts executing the user's own functional functions. Note: When adding their own functional functions, users must add their own blocking at the end to prevent the functional function from being interrupted before execution is complete and the MOVJ motion below from starting!
bool userdefinecmd(int id, const std::string & paramStr,const std::string & posName)
{
	// id : Corresponds to the first parameter in the teach pendant interface userdefine_cmd_insert
	// paramStr : Corresponds to the second parameter in the teach pendant interface userdefine_cmd_insert
	int robotNum = 1;             // Define the robot number to control
	if (id == 1)
	{


	}
	else if (id == 2)
	{
	        NRC_Position pos1 = {NRC_ACS, 40, 0, 0, 0, 0, 0};
		NRC_Position pos2 = {NRC_ACS, 0, 0, 0, 0, 0, 0};
		NRC_Position pos3 = {NRC_ACS, -40, 0, 0, 0, 0, 0};       // Robot motion target positions


		NRC_Jobrun_MoveDirect(robotNum, pos1, 80, 50, 50, 0);
		NRC_Jobrun_MoveDirect(robotNum, pos2, 80, 50, 50, 0);
		NRC_JobRun_BlockNotMoveInstruction();// Blocking interface, blocks the program at this position, and unblocks after the previous MOVJ motion reaches the target point
		/**
                 * ........................
                 *   User's own functional functions
                 * ........................
                */
		NRC_Jobrun_MoveDirect(robotNum, pos3, 80, 50, 50, 0, true);    // The last motion instruction must advance to the next line, pass true to moveToNextLine!!! Otherwise there may be a robot runaway accident!
	}
	else
	{
		printf("no this cmd");
	}


	return true;
}