티치 펜던트 사용자 정의 명령어 사용 예시
본 문서는 QT 개발 기초가 있는 사용자에게만 적용됩니다
본 문서는 주로 관련 다운로드 내 티치 펜던트 2차 개발 demo를 중심으로 설명하며, demo의 코드와 함께 보아야 합니다
1. 사용자 정의 명령어 인터페이스
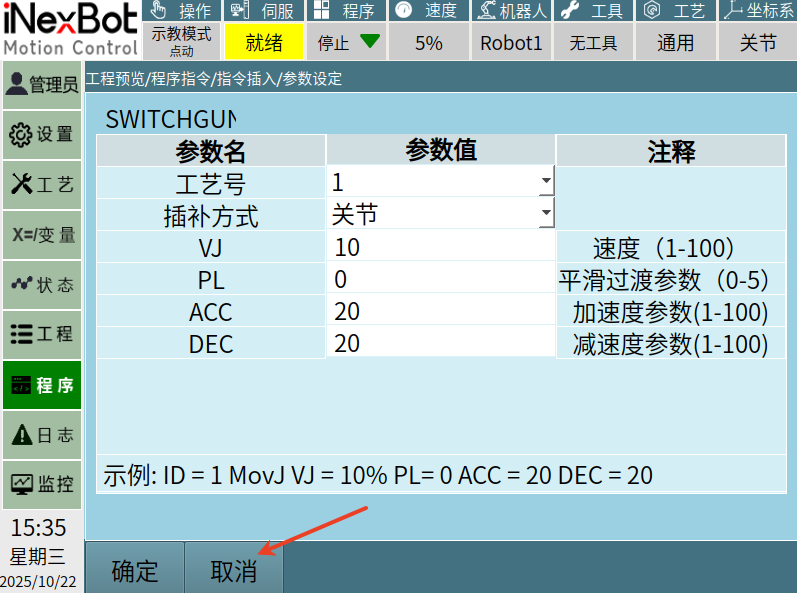
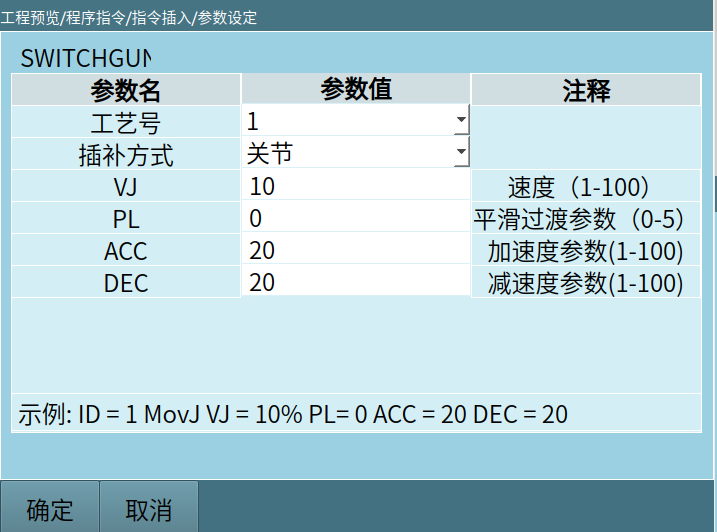
사용자는 자신의 취향에 따라 명령어 인터페이스를 직접 설계할 수도 있고, 당사의 템플릿 인터페이스를 직접 사용할 수도 있습니다. 아래 그림은 demo에서 설계한 인터페이스 예시입니다 (사용자는 이 예시를 직접 사용하여 수정하거나 복사하여 새 인터페이스를 추가할 수 있습니다)
2. 명령어 삽입 인터페이스의 사용자 정의 명령어 클래스의 명령어 설정
주로 사용되는 인터페이스:
userdefined_cmd_name_change : 삽입 인터페이스에 표시되는 사용자 정의 명령어 이름을 수정하며, 효과는 아래 그림과 같습니다:
QStringList ENname ;
ENname <<"SWITCHGUN"<<"SWITCHGUNPOS";
QStringList CNname;
CNname << tr("换枪动作")<<tr("이동到换枪위치");
Nextp::getInstance()->userdefined_cmd_name_change(ENname, CNname);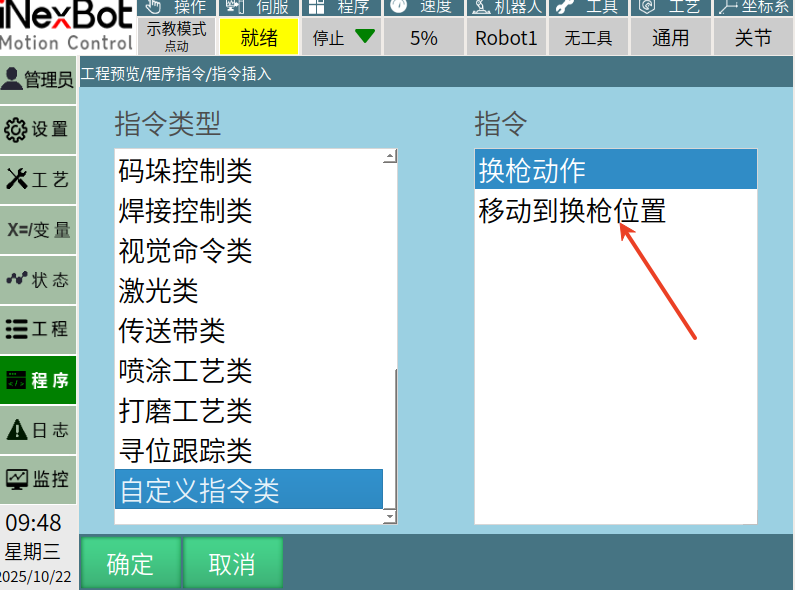
3. 사용자 정의 명령어 인터페이스 열기
주로 사용되는 인터페이스:
signal_userdefine_cmd_init : 본 함수는 qt의 신호 함수로, 슬롯 함수와 연결하여 사용해야 하며, 사용자가 직접 작성한 사용자 정의 명령어 인터페이스를 여는 데 사용됩니다
connect(Nextp::getInstance(),SIGNAL(signal_userdefine_cmd_init(int)),this,SLOT(slot_userdefine_cmd_init(int)));


void WidgetManager::slot_userdefine_cmd_init(int cmd_num)    //cmd_num은 명령어 삽입 인터페이스에서 위에서 아래로의 순서에 해당합니다
{
    if(cmd_num == 1)                                        //인터페이스의 换枪动作 명령어에 해당
    {
    }
    if(cmd_num == 2)                                       //인터페이스의 이동到换枪위치 명령어에 해당
    {
        //2차 개발 인터페이스의 창 내 위치 설정 및 인터페이스 열기
        Nextp::getInstance()->setWidgetParentLocation((QWidget *)SwitchGunPosCommand::getInstance(), 86, 96);//인터페이스 열기 위치 설정
        SwitchGunPosCommand::getInstance()->initSwitchGunPosCmd();
        SwitchGunPosCommand::getInstance()->raise();
        SwitchGunPosCommand::getInstance()->show();     //인터페이스 열기
    }
}
Ps: SwitchGunPosCommand는 첫 번째 단계의 사용자 정의 명령어 인터페이스입니다
4. 사용자 정의 명령어 삽입
사용자 정의 명령어 인터페이스 내 확인 컨트롤의 클릭 이벤트가 slot_cmdInsertEnsureClicked 슬롯 함수에 바인딩되어 있습니다:
SwitchGunPosBtnEnsure는 확인 컨트롤의 이름입니다
connect(ui->SwitchGunPosBtnEnsure, SIGNAL(clicked()), this, SLOT(slot_cmdInsertEnsureClicked()));

void SwitchGunPosCommand::slot_cmdInsertEnsureClicked()
{
    int ID = ui->m_pcomboBoxGP_ID->currentIndex()+1;
    int moveType = ui->m_pcomboBoxGP_TYPE->currentIndex();
    double vel = ui->m_pLineEditSwitchGP_V->text().toDouble();
    double acc = ui->m_pLineEditSwitchGP_ACC->text().toDouble();
    double dec = ui->m_pLineEditSwitchGP_DEC->text().toDouble();
    int pl = ui->m_pLineEditSwitchGP_PL->text().toInt();
    QString Param = "이동到换枪위치 " + QString::number(ID) + " " + QString::number(moveType) + " " + QString::number(vel) +         " " + QString::number(acc)
             + " " + QString::number(dec) + " " + QString::number(pl);    //전송할 매개변수 캡슐화
    Nextp::getInstance()->userdefine_cmd_insert(2,Param);  // 2: 사용자 정의 명령어 번호, 컨트롤러 콜백 함수의 첫 번째 int 매개변수에 해당
    this->hide();      //명령어 삽입 후 사용자 정의 인터페이스 닫기
}
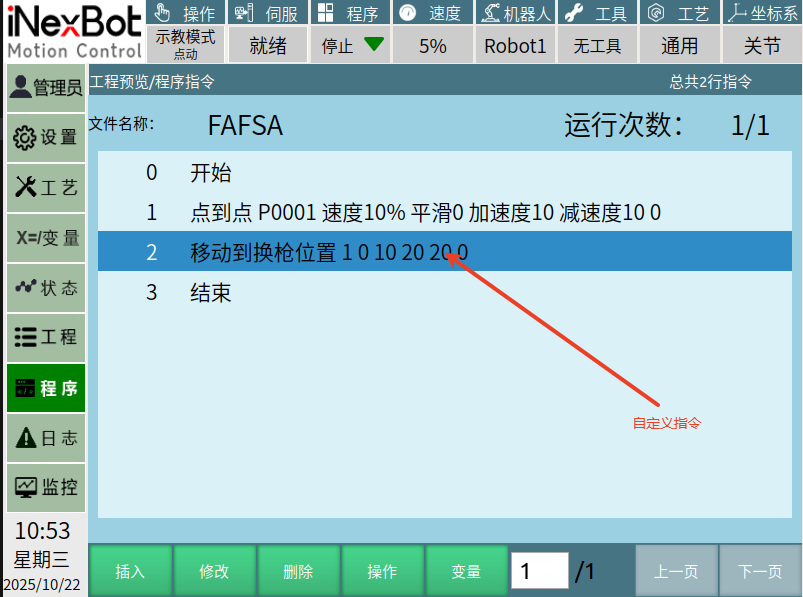
인터페이스에서 컨트롤러로 전송해야 하는 매개변수를 문자열 타입으로 캡슐화한 후, userdefine_cmd_insert 인터페이스를 통해 작업 파일에 명령어를 삽입합니다
5. 사용자 정의 명령어 수정
사용자 정의 명령어가 이미 작업 파일에 삽입된 후, 명령어의 매개변수를 수정해야 할 때
주로 사용되는 인터페이스:
signal_userdefine_cmd_alter : 사용자 정의 명령어 인터페이스 수정 신호 함수 호출
connect(Nextp::getInstance(),SIGNAL(signal_userdefine_cmd_alter(int,QString,QString)),this,SLOT(slot_userdefine_cmd_alter(int,QString,QString)));      //커서가 사용자 정의 명령어를 선택하고 수정 컨트롤을 클릭하면 본 슬롯 함수가 트리거됩니다


void WidgetManager::slot_userdefine_cmd_alter(int cmd_num, QString cmd_param, QString pos_name)
{
    if(cmd_num == 1)                                        //인터페이스의 换枪动作 명령어에 해당
    {
    }
    if(cmd_num == 2)                                       //인터페이스의 이동到换枪위치 명령어에 해당
    {
        //2차 개발 인터페이스의 창 내 위치 설정 및 인터페이스 열기
        Nextp::getInstance()->setWidgetParentLocation((QWidget *)SwitchGunPosCommand::getInstance(), 86, 96);//인터페이스 열기 위치 설정
        SwitchGunPosCommand::getInstance()->initSwitchGunPosCmd();
        SwitchGunPosCommand::getInstance()->raise();
        SwitchGunPosCommand::getInstance()->show();     //인터페이스 열기
    }
}
6. 사용자 정의 명령어 인터페이스 닫기
사용자가 사용자 정의 명령어 인터페이스를 연 후 명령어를 삽입하고 싶지 않을 때, 이 인터페이스를 직접 닫으면 상위 인터페이스로 돌아갈 수 있습니다
인터페이스 내에 돌아가기 또는 취소 컨트롤을 생성하고, 이 컨트롤에 인터페이스 닫기 슬롯 함수를 바인딩하면 됩니다
SwitchGunPosBtnCancel은 demo의 사용자 정의 명령어 인터페이스의 취소 컨트롤이며, 예시는 다음과 같습니다:
connect(ui->SwitchGunPosBtnCancel, SIGNAL(clicked()), this, SLOT(slot_cmdInsertCancelClicked()));

void SwitchGunPosCommand::slot_cmdInsertCancelClicked()
{
    this->close();
}